
Description
10 Segment LED Bar Graph Indicator in Pakistan
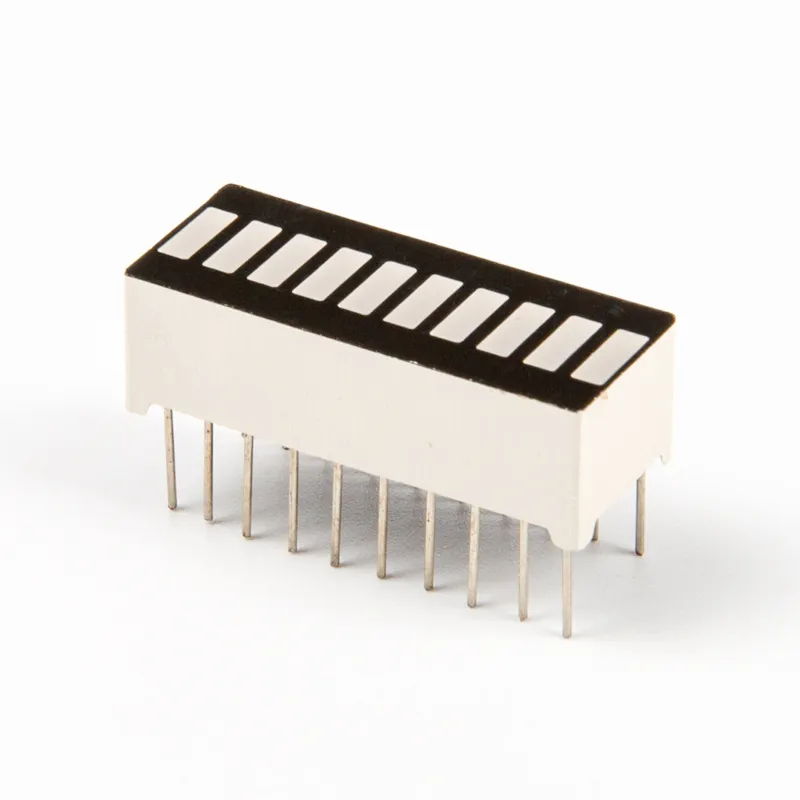
The 10 Segment LED Bar Graph Indicator is an electronic display component designed to represent changing values through illuminated LED segments. It contains ten individual LED elements arranged in a compact rectangular package.
Each segment can be controlled separately, allowing the display to show different levels or values. For example, one illuminated segment can represent a low reading, while multiple illuminated segments can indicate a higher reading.
This LED bar graph is commonly used with Arduino boards, microcontrollers, voltage indicators, audio level meters, battery monitoring circuits and sensor-based projects.
It is a useful component for electronics students, hobbyists, engineers and DIY electronics developers.
Technical Specifications
| Specification | Details |
|---|---|
| Product Name | 10 Segment LED Bar Graph Indicator |
| Display Type | LED Bar Graph |
| Number of Segments | 10 |
| Display Arrangement | Single-row rectangular |
| LED Configuration | Multiple individual LEDs |
| Colour | Depends on supplied variant |
| Package Type | Through-hole |
| Mounting Type | PCB mounting |
| Control Method | Individual LED control |
| Applications | Voltage indicators, Arduino and electronics projects |
Technical note: LED colour, forward voltage, pin configuration, common-anode/common-cathode arrangement and current ratings depend on the exact model. Check the component datasheet or identify its pinout before connecting it.
Key Features
-
10 individual LED segments: Displays different levels using illuminated bars.
-
Compact rectangular design: Suitable for PCB mounting and electronic instruments.
-
Visual level indication: Converts changing electrical signals into easy-to-read visual information.
-
Microcontroller compatible: Can be interfaced with Arduino and other suitable controllers.
-
Multiple applications: Useful for voltage, audio, battery and sensor-level indicators.
-
Through-hole terminals: Designed for conventional PCB installation.
Applications
-
Arduino LED bar graph projects
-
Battery level indicators
-
DC voltage monitoring circuits
-
Audio level meters and sound indicators
-
Sensor measurement displays
-
Signal strength indicators
-
Electronic testing instruments
-
DIY educational electronics projects
-
Microcontroller-based display systems
Installation / Setup
-
Identify the LED bar graph’s pin configuration using its datasheet.
-
Determine whether the component uses a common-anode or common-cathode arrangement.
-
Connect each LED segment through an appropriate current-limiting resistor.
-
Connect the display to the microcontroller or driver circuit.
-
Configure the output pins to control the required segments.
-
Test each LED individually before using the complete bar display.
Arduino connection tip: Avoid connecting all ten LEDs directly to GPIO pins without checking the controller’s current limits. A suitable LED driver or shift register can simplify control and reduce the number of required GPIO pins.
Precautions
-
Always verify the pinout before applying power.
-
Use suitable current-limiting resistors for individual LED segments.
-
Do not exceed the specified LED forward current.
-
Check the operating voltage and LED colour specifications.
-
Avoid reversing the polarity of the LED connections.
-
Use a suitable driver circuit when controlling multiple segments.
-
Follow the datasheet for correct PCB installation.
YouTube Tutorial
10 Segment LED Bar Graph Arduino Tutorials
Buy from Electroway Pakistan
Explore LED displays, indicator components, Arduino boards, resistors, microcontrollers and other electronic accessories at Electroway.org.
You can also browse available electronics products through the Electroway App.
Product Summary
The 10 Segment LED Bar Graph Indicator is a compact electronic display component featuring ten individual LED segments. It is suitable for creating visual level indicators, voltage monitors, audio meters, battery indicators and Arduino-based electronics projects.
Reviews
There are no reviews yet.